Rendering cycle
Let’s take a quick look at the interaction between different layers in a typical Angular web application and the job they have.
Let’s start with the high-level overview and the dive into details after that.
As I mentioned in the “Overview” section, an application state is the data that drives the updates on the screen.
This data is used to update DOM, which is then used by the browser to render various visual elements like text, images, buttons etc.
Updates to the application state are caused by asynchronous events initiated by user actions.
For Angular to know when the application state might change, it needs to know when those events occur.
This is where zone.js library comes into play.
This library decorates (patches) browser platform’s API so that all asynchronous events in the browser can be intercepted.
Angular binds to the hooks exposed by zone.js and uses notifications about DOM events, timeouts, AJAX/XHR, Promise etc. as a cue to run change detection in Big Picture.
The assumption here is that most events cause application state change that needs to be reflected in the DOM and correspondingly on the screen.
This is how change detection is able to automatically run after each asynchronous event.
Once an event handler finishes executing, Angular will run change detection.
Angular doesn’t directly interact with zone.js, but instead uses NgZone,
which is a kind of a wrapper around zone.js to restrict scope of the events that Angular should be notified about
(more on this in the chapter on zone.js).
So how does Angular interact with zones?
When an event fires related to the Angular zone (NgZone), an event handler attached to the event runs.
Most often this method is the application exposed on the component instance.
The business logic can update whatever data it wants to – the shared application model/state and/or the component’s view state.
After that, when Angular gets the notification from NgZone that there are no outstanding microtasks,
it then runs Angular’s change detection algorithm.
By default (i.e., if you are not using the onPush change detection strategy on any of your components),
every component in the tree is examined once from the top, in depth-first order (see “order of checks” here on ).
If you’re in dev mode, change detection runs twice because of the extra check Angular performs to ensure stable state
(see chapter on unidirectional data flow). It performs dirty checking on all of your bindings, using those change detector objects.
Lifecycle hooks, queries and bindings are processed as part of change detection
(see the chapter on operations for more information).
In Angular each component is represented as a data structured called LView.
This is where the framework keeps track of the state (last value) for all template bindings, such as {{service.a}}.
Those values are used during change detection for dirty checking to determine
if the side effect related to the change needs to be executed.
There’s one to one relationship between a component instance and its corresponding LView.
Angular encapsulates an LView
with the ChangeDetectorRef service
that provides change detection functionality. You can get access to this object by injecting it into components constructor.
There’s one such change detector service per component, so Angular maintains a tree of change detectors that maps to the tree of components.
The change detection graph is a directed graph (unidirectional data flow) and cannot have cycles.
At this point JavaScript JavaScript yields control to the browser. The event has been processed,
business logic updated application state and Angular updated DOM during change detection.
Time for the browser to render the updates on the screen and go on to execute macrotasks that might have been scheduled,
like network requests or timers.
The process of updating the screen includes a well known pipeline of rendering and painting stages broken into substages:
- [Rendering] Style calculations. This is the process of figuring out which CSS rules apply to which elements based on matching selectors, for example,
.headlineor.nav > .nav__item. From there, once rules are known, they are applied and the final styles for each element are calculated. - [Rendering] Layout. Once the browser knows which rules apply to an element it can begin to calculate how much space it takes up and where it is on screen. The web’s layout model means that one element can affect others, for example the width of the
<body>element typically affects its children’s widths and so on all the way up and down the tree, so the process can be quite involved for the browser. - [Painting] Paint. Painting is the process of filling in pixels. It involves drawing out text, colors, images, borders, and shadows, essentially every visual part of the elements. The drawing is typically done onto multiple surfaces, often called layers.
- [Painting] Compositing. Since the parts of the page were drawn into potentially multiple layers they need to be drawn to the screen in the correct order so that the page renders correctly. This is especially important for elements that overlap another, since a mistake could result in one element appearing over the top of another incorrectly.
The browser doesn’t necessarily run every substage of the pipeline on every frame.
Some changes might only affect a “paint only” property does not affect the layout of the page,
like a background image, text color, or shadows, then the browser skips layout, but it will still do paint.
The cheapest and most desirable pipeline is the one that skips all parts except compositing,
which is usually the case for animations or scrolling.
We will explore the job of a browser in my next module in the course focusing on the performance in Angular applications.
Meanwhile, I highly recommend this awesome article The Anatomy of a Frame.
So we basically have 4 parts here:
- browser: rendering (style, layout), painting (painting, compositing)
- zone.js: monkey-patching browser API, tasks lifecycle management and notifications
- angular: change detection, DOM updates
- application: business logic, updating application state
Let’s take a look at the concrete example.
An in-depth look
Let’s say we have this simple setup:
import { Component } from '@angular/core';

@Component({
  selector: 'app-root',
  template: `
    <div class="container">
      <div>
        <button (click)="fetchData()">Fetch data</button>
        {{ status }}
        <div>title: {{ title }}</div>
      </div>
    </div>
  `,
  styleUrls: ['./app.component.css'],
})
export class AppComponent {
  title = 'learn-angular';
  status = null;

  fetchData() {
    this.status = 'Loading...';
    const req = new XMLHttpRequest();

    req.open('GET', 'https://jsonplaceholder.typicode.com/todos/1', true);

    req.onreadystatechange = () => {
      if (req.readyState === XMLHttpRequest.DONE && req.status === 200) {
        const todo = JSON.parse(req.responseText);
        this.title = todo.title;
        this.status = null;
      }
    };

    req.send(null);
  }
}
That works like this:
I’m using XHR here instead of fetch to simply Profiler logs.
The fetch is Promised based so if I use it I’ll see noise in the logs coming from scheduling and handling microtasks.
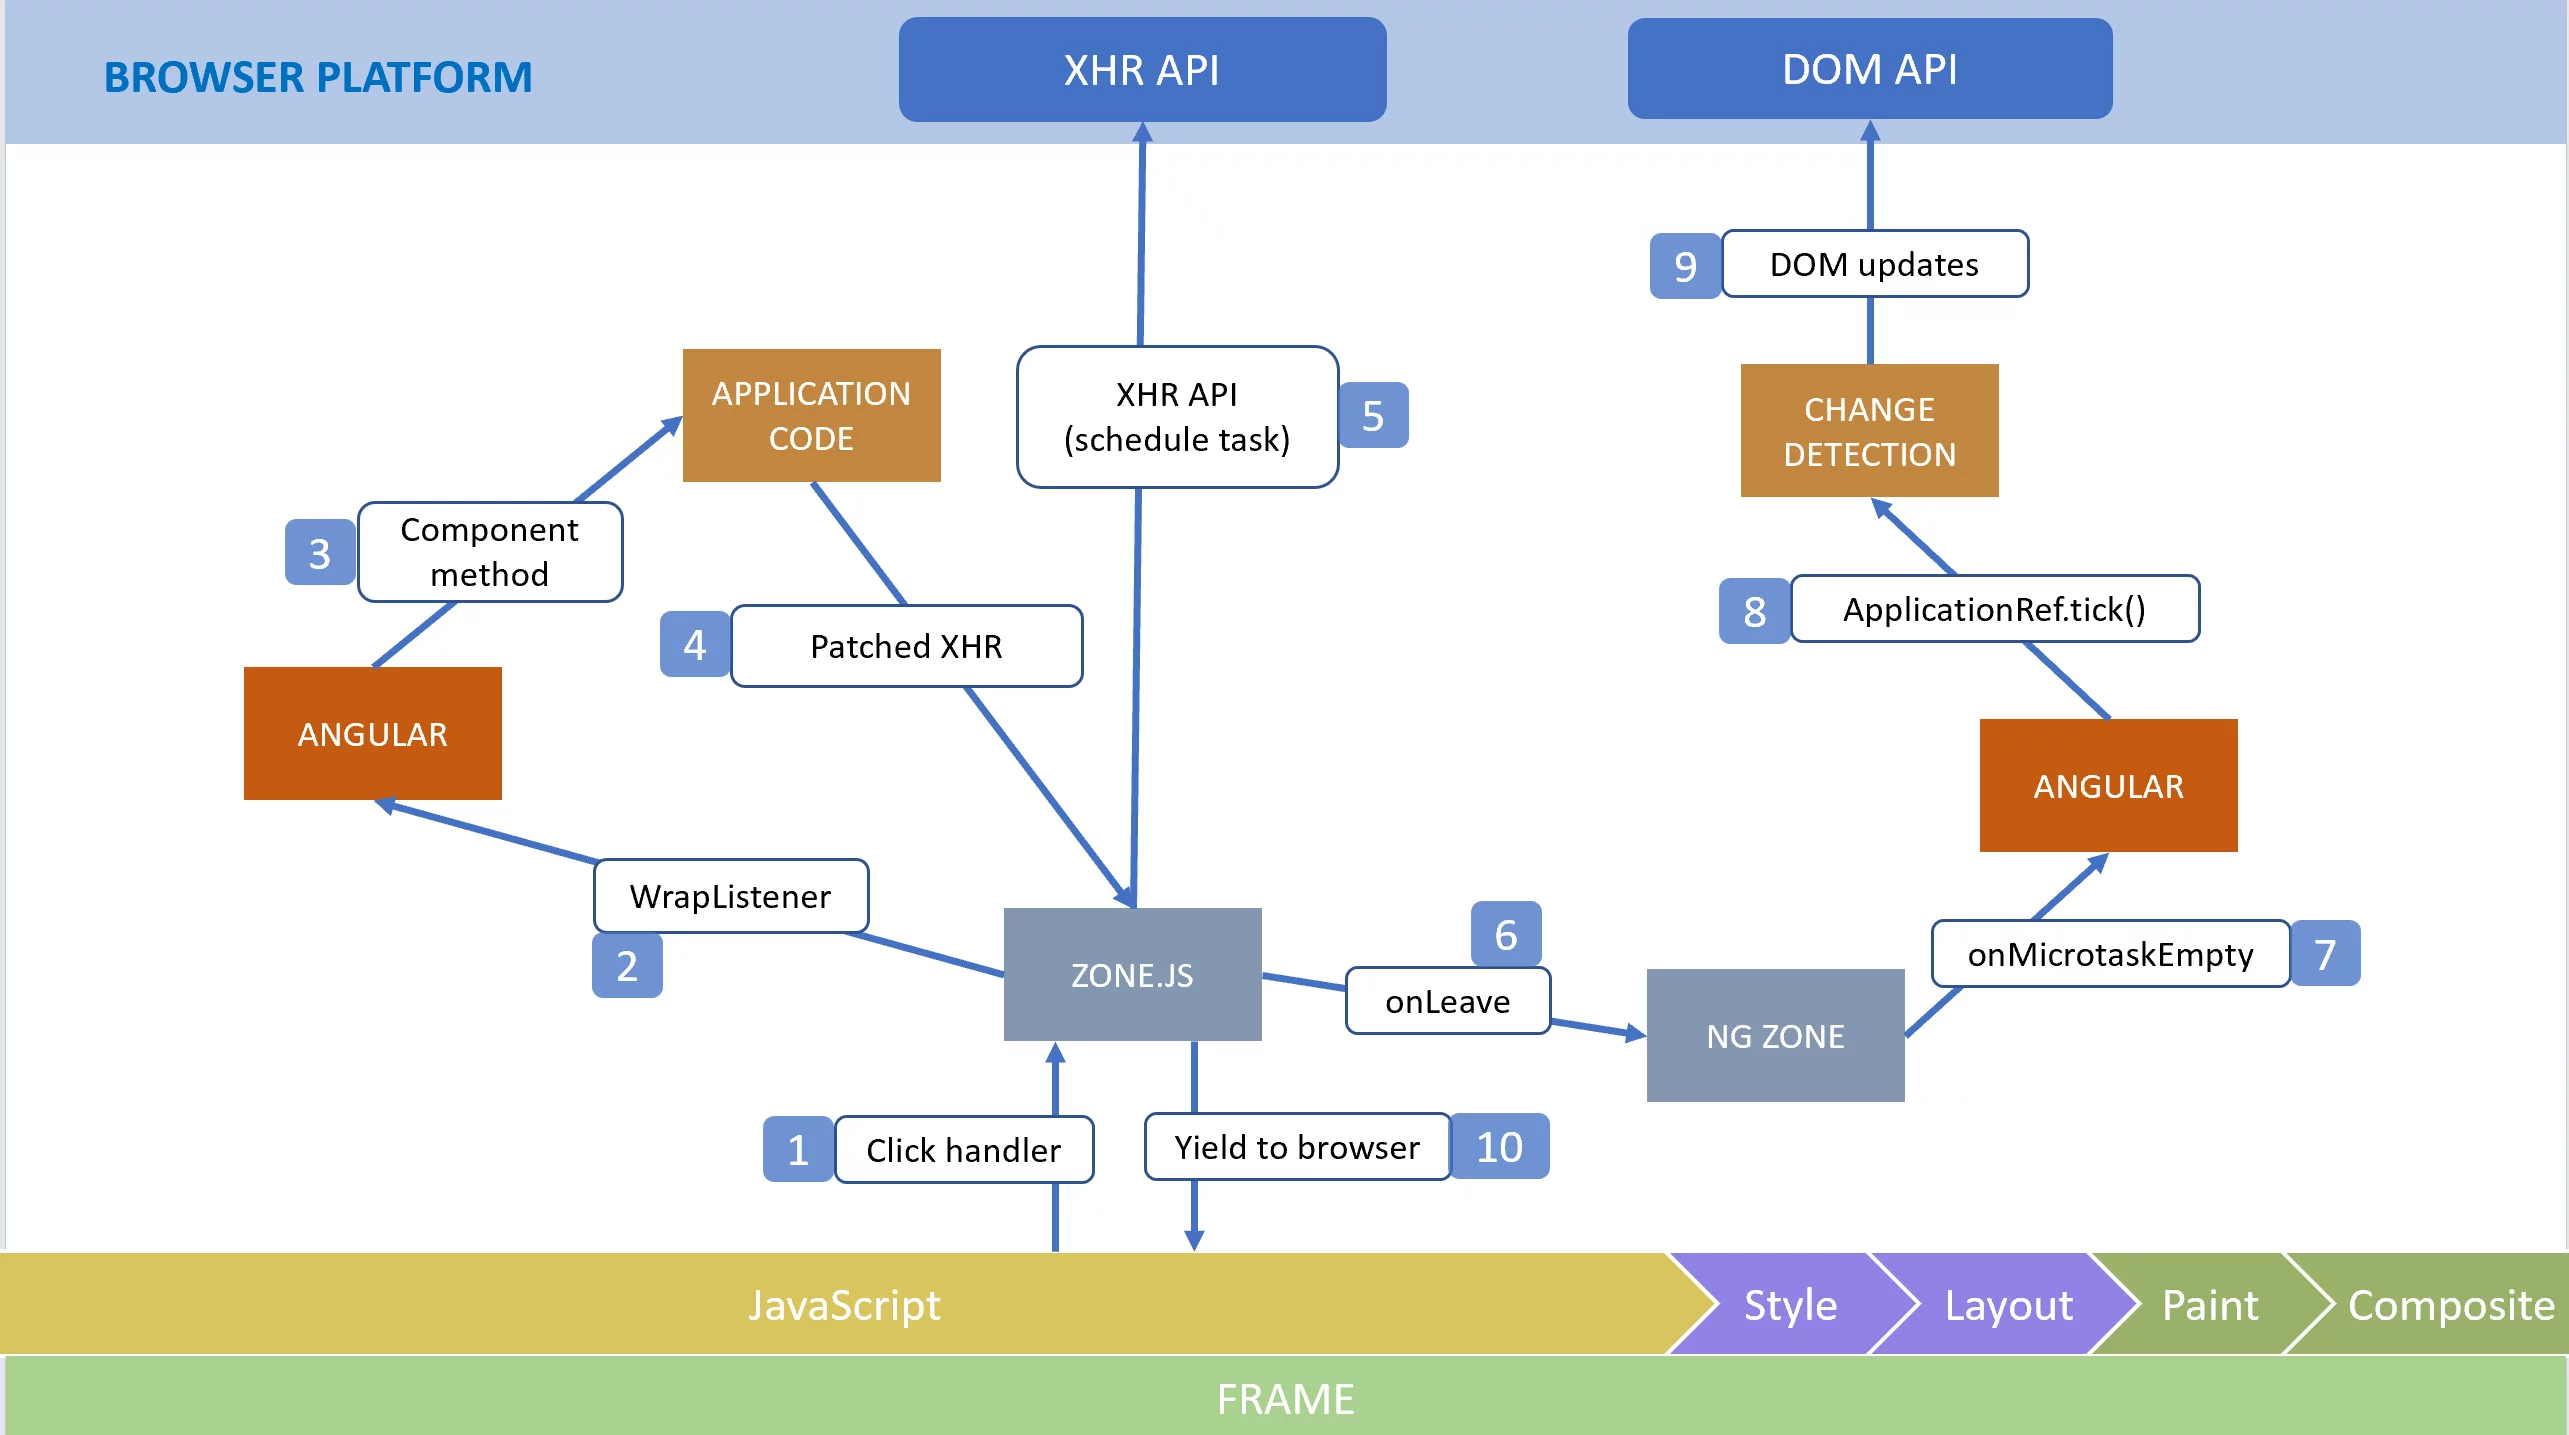
So here’s detailed overview of what’s happening:
- browser detects the click & adds an event handler to the event queue (browser)
- zonejs starts with zoneAwareCallback which simply runs callback registered by Angular
- angular executes the wrapper around the callback from a component’s template; the wrapper marks the view and all its ancestors dirty
- angular runs
fetchDatacomponent method through the event listener registered in a component template function - business logic inside
fetchDataapplication code runs network request - the request is intercepted by
zone.jswhich schedules macrotask with a browser - the event is processed now,
zone.jstriggers onMicrotaskEmpty throughNgZone - angular reacts by running application wide change detection through ApplicationRef.tick
- change detection updates the DOM and runs other side effects
- browser renders updates on the screen and goes on to execute the macrotask related to the network request.When the network request arrives, the lifecycle repeats, running the event listener
for theonreadystatechangeevent instead of theclickevent. JavaScript phase
ends with Angular running change detection. After that the browser again goes
through the rendering pipeline.
This lifecycle looks like this when depicted on a diagram:
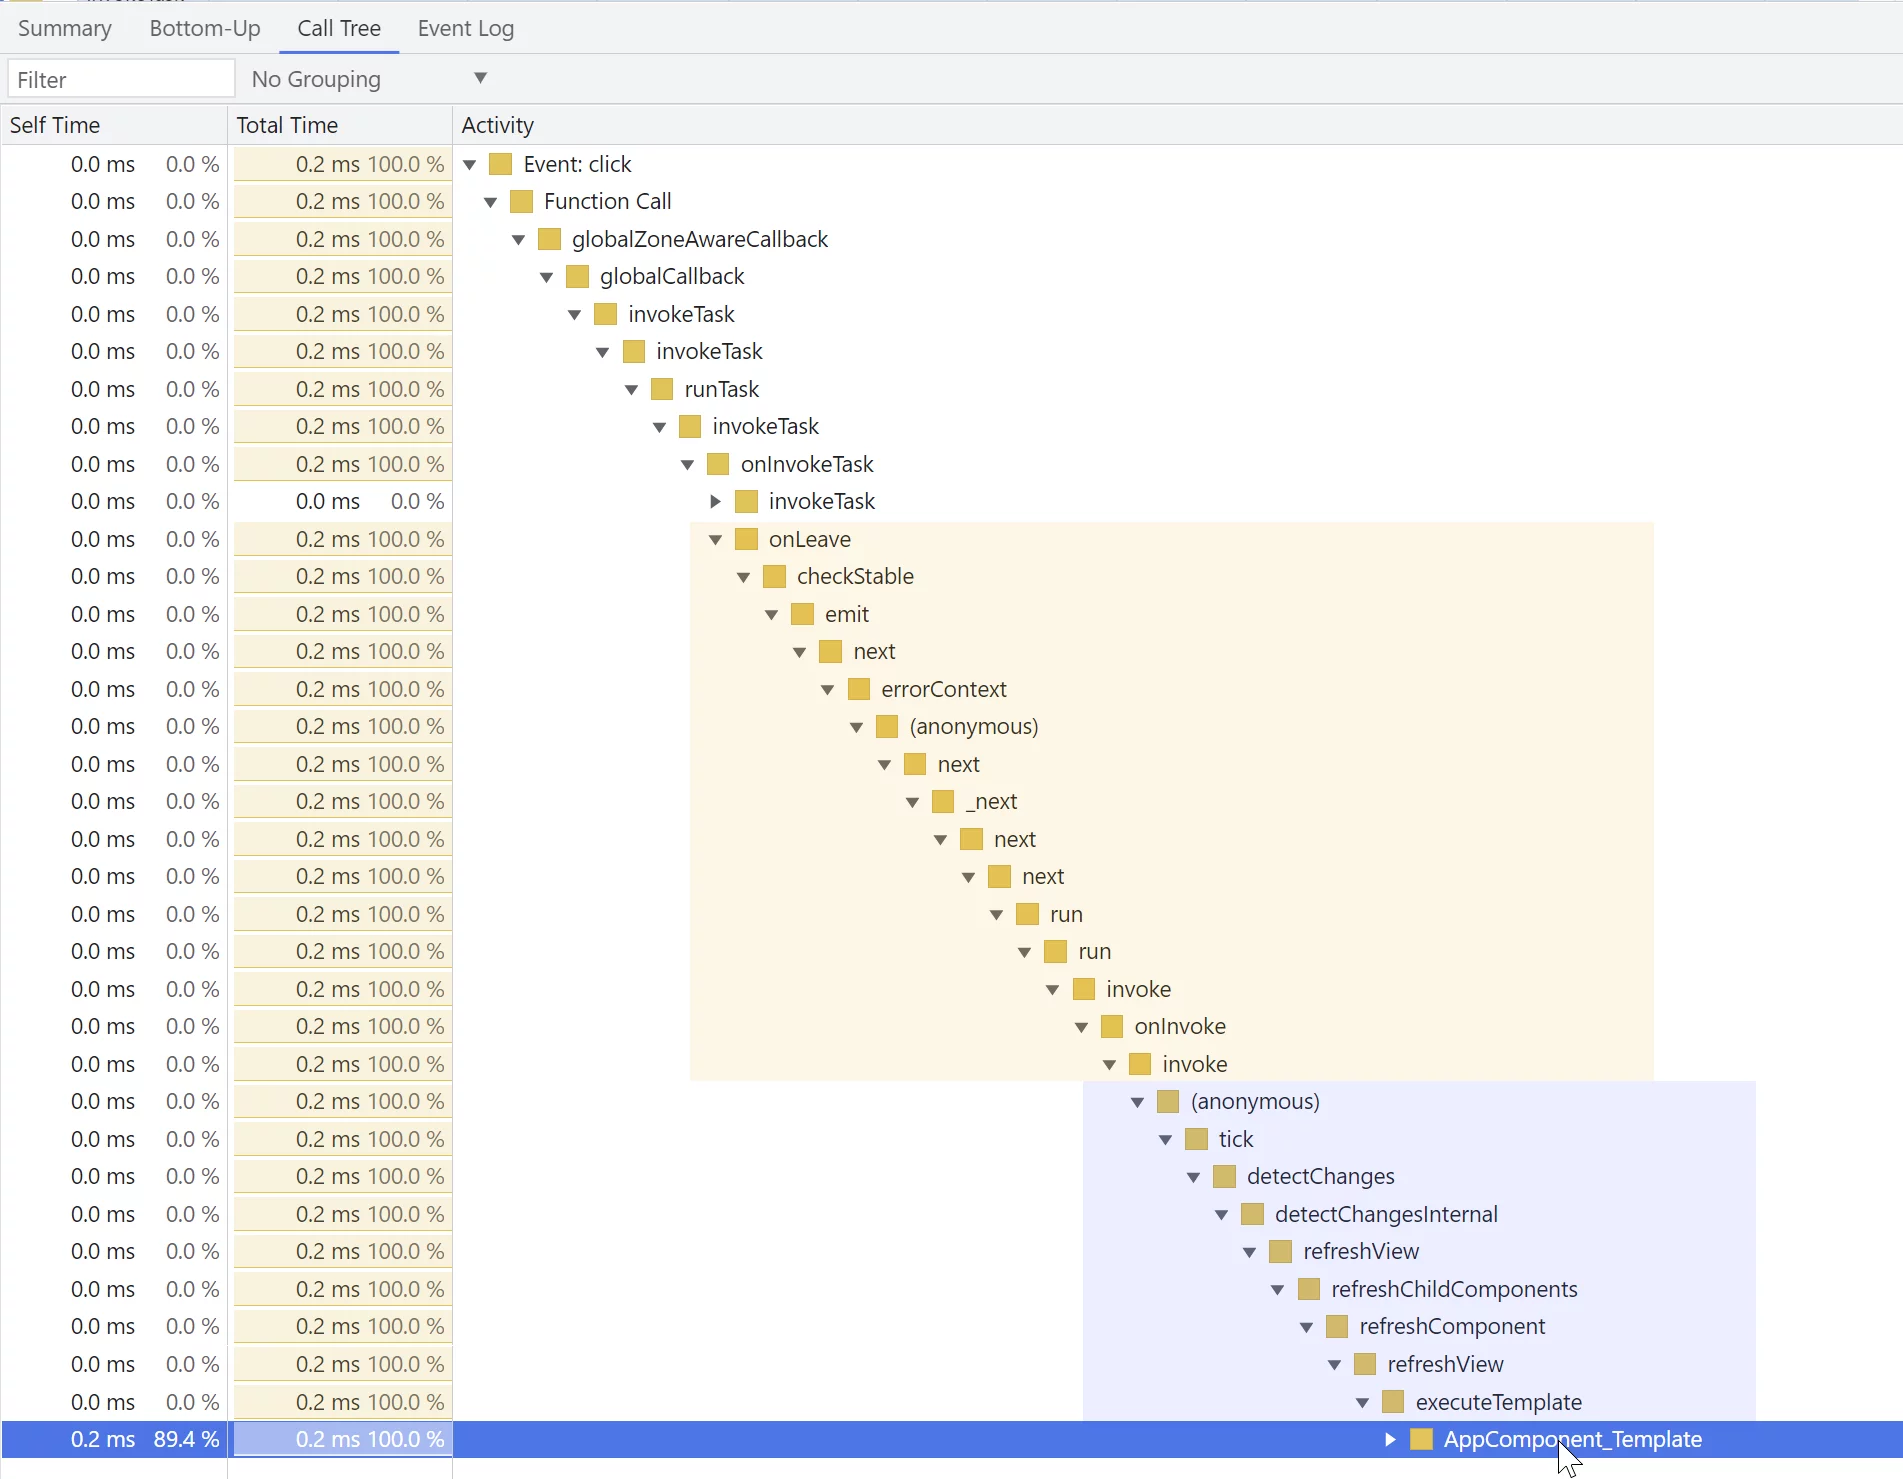
With can see this all using Chrome Dev Tools profiler.
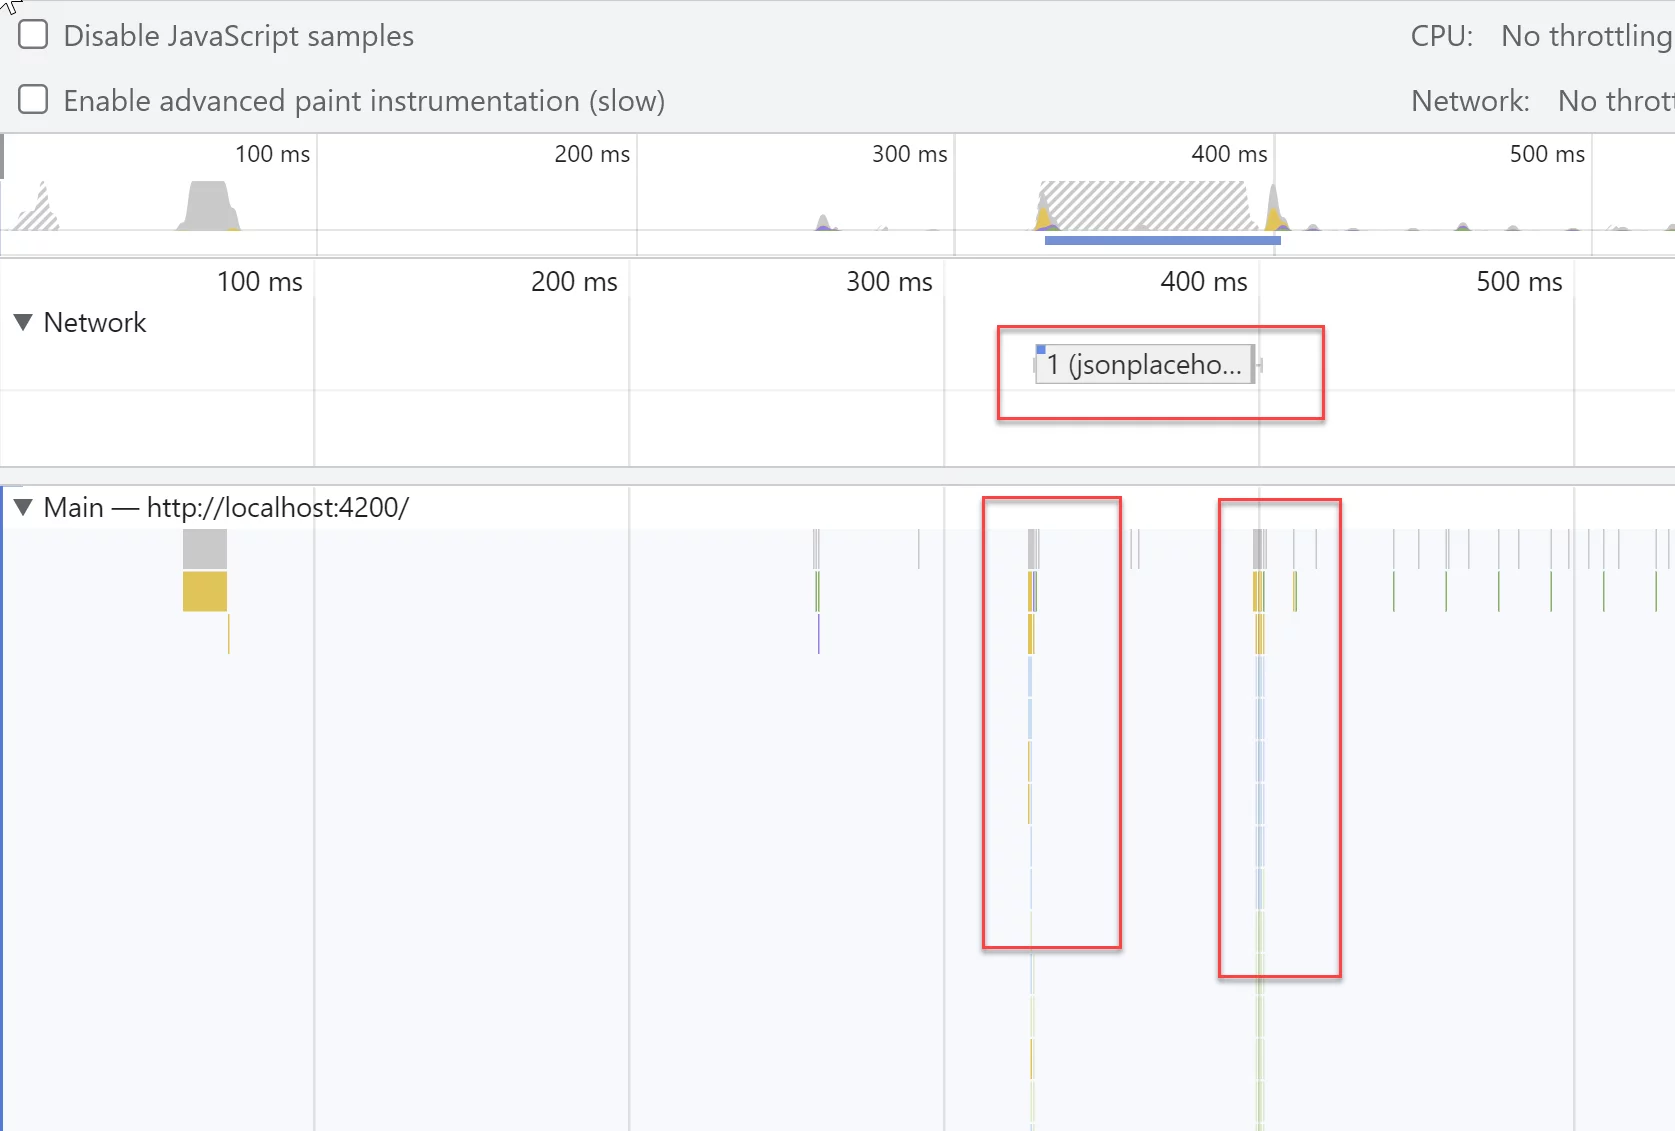
We can use Call Stack to see the order of executions, select Click event:
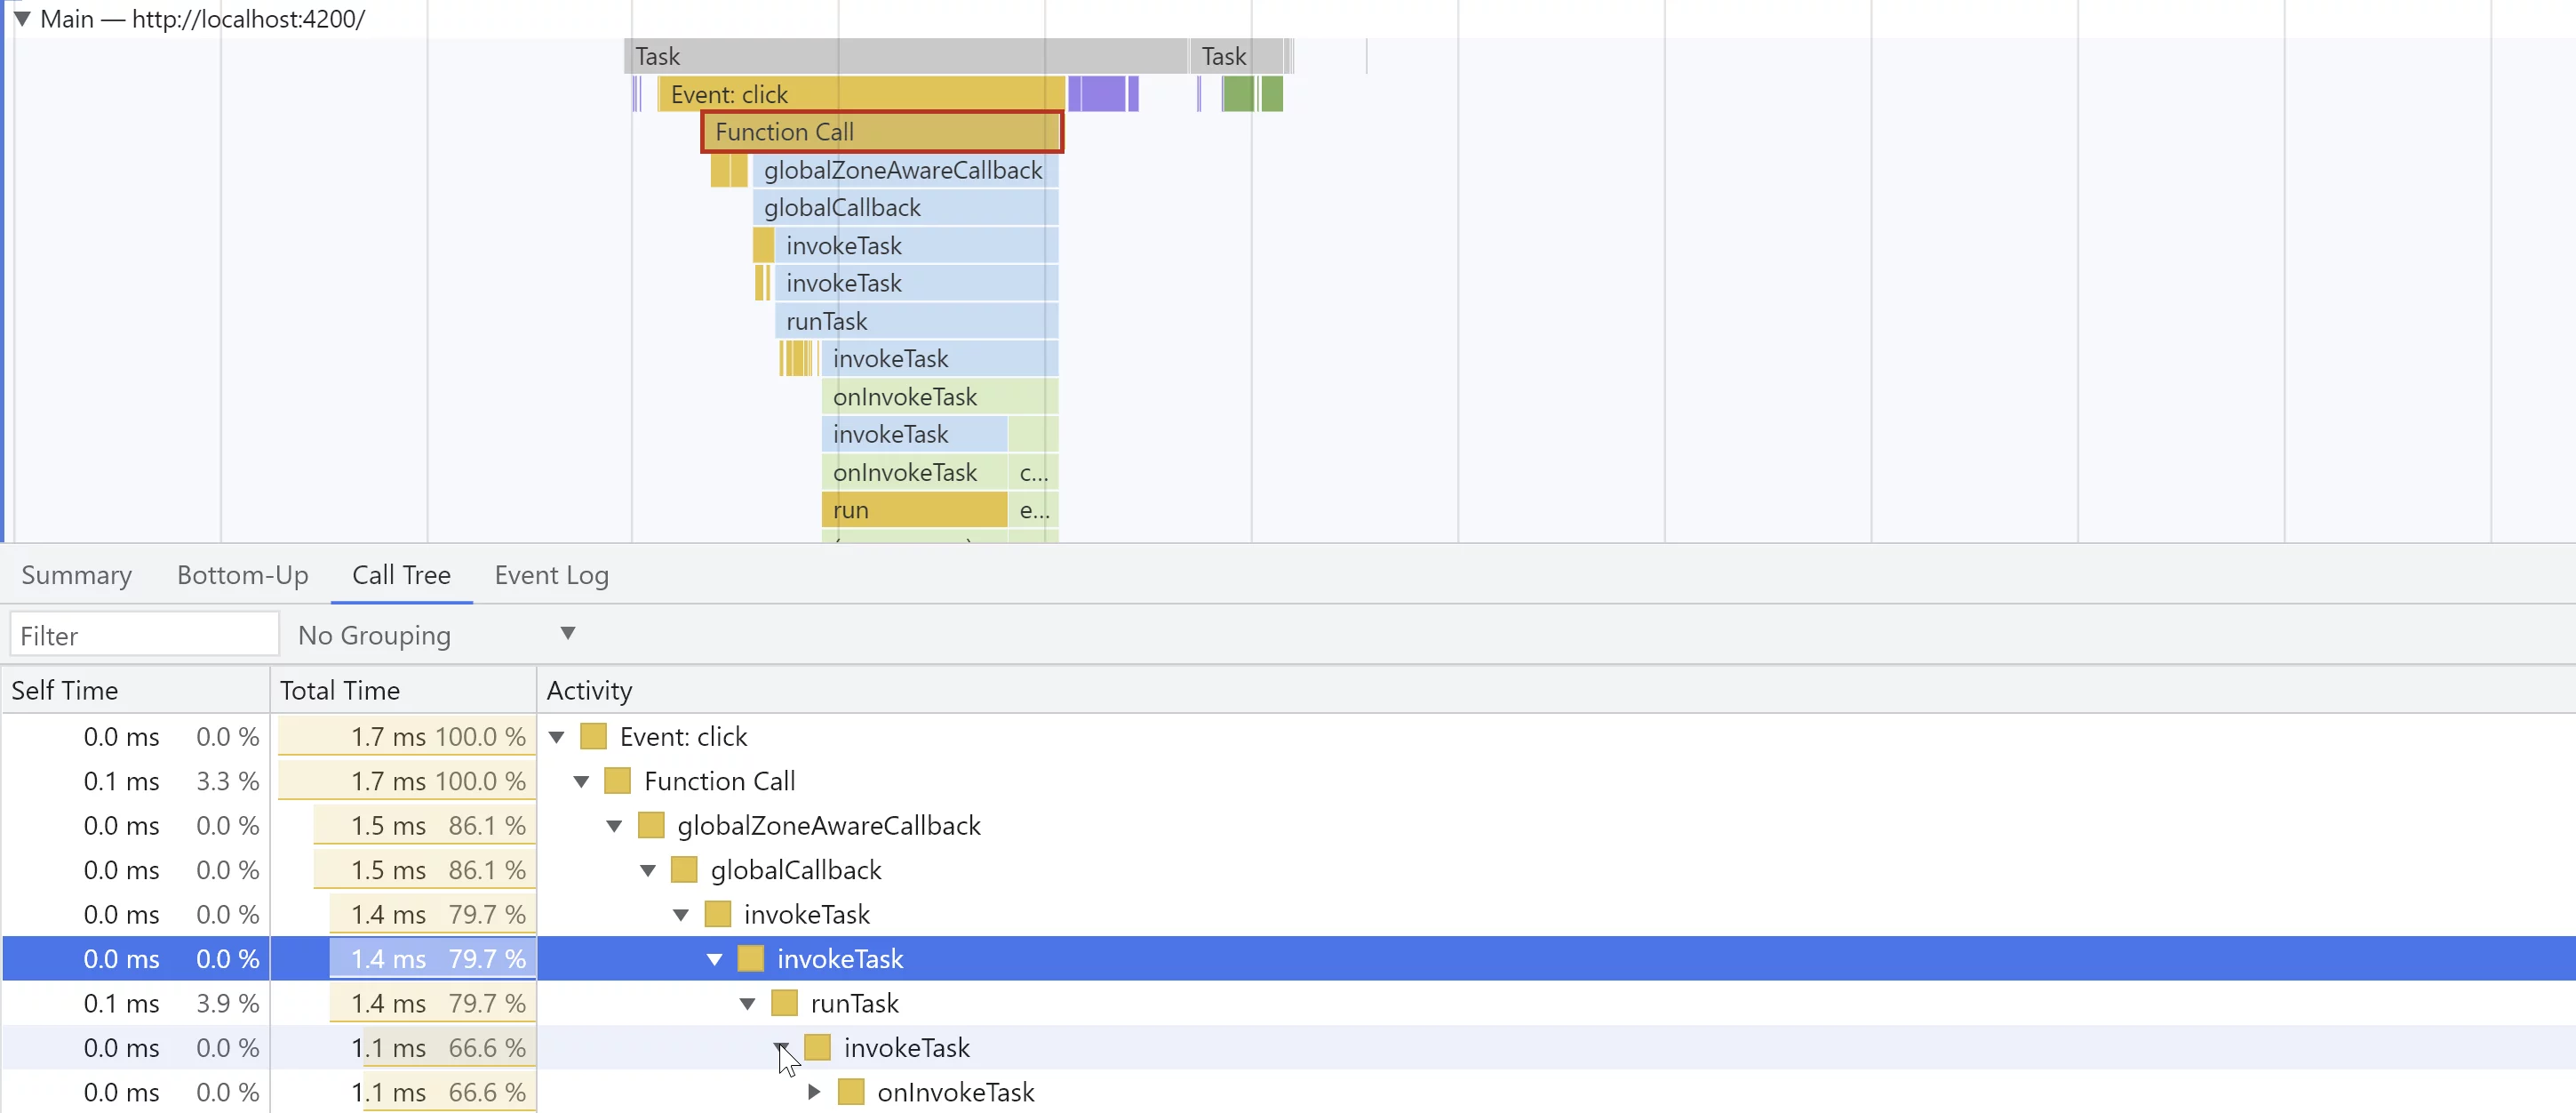
When we expand it downwards here’s what we discover:

I marked sections related to actors with the following colors:
- yellow – zone.js
- purple – angular
- green – application
There’s another branch of the call stack that leads to change detection:
Once Angular completes its change detection the browser runs through its pipeline – style, layout, paint and, in some cases, compositing:

There’s one particularly interesting case to explore that involves using setTimeout to wait for change detection to finish.
Let’s talk about it.
setTimeout and change detection
You may often see the usage of setTimeout inside the application logic.
Assume the requirement is to show the input control and immediately focus it when user clicks on a button.
Here’s how we could do it:
import { Component } from '@angular/core';

@Component({
  selector: 'b-cmp',
  template: `
    Add a new todo:
    <button (click)="showSearchInput(ctrl)">Add</button>
    <div [hidden]="searchInputHidden">
      <input #ctrl />
    </div>
  `,
})
export class B {
  searchInputHidden = true;

  showSearchInput(ctrl) {
    this.searchInputHidden = false;

    setTimeout(function () {
      ctrl.focus();
    });
  }
}
Here’s how it looks:
The code itself is pretty straightforward. The application reacts to the user input, runs change detection
and updates the component state. Angular runs change detection and updates the DOM.
But why do we need to use setTimeout?
The timeout is required because you can’t focus() an element that is still hidden.
Until Angular change detection has a chance to run (which will be after method showSearchInput() finishes executing),
the hidden property in the DOM will not be updated, even though you set searchInputHidden to false in your method.
By using setTimeout() with a value of 0 (or no value, which defaults to ~4ms)
we schedule a macrotask that will run after Angular gets a chance to run change detection and update the hidden property value.
Note that after the setTimeout() callback function finishes executing,
change detection will run again (because Angular monkey-patches all setTimeout() calls that are made in the Angular zone).
Since the only thing we are changing in our asynchronous callback function is the focus, we can be more efficient
and run our callback function outside the Angular zone, to avoid the additional change detection cycle:
import { Component } from '@angular/core';

@Component({
  selector: 'b-cmp',
  template: `
    Add a new todo:
    <button (click)="showSearchInput(ctrl)">Add</button>
    <div [hidden]="searchInputHidden">
      <input #ctrl />
    </div>
  `,
})
export class B {
  searchInputHidden = true;

  private showSearchInput(ctrl) {
    this.searchInputHidden = false;

    this._ngZone.runOutsideAngular(() => {
      setTimeout(() => ctrl.focus());
    });
  }
}
Note that you’ll have to inject NgZone into your constructor for the above code to work:
import { NgZone } from '@angular/core';

export class B {
  constructor(private _ngZone: NgZone) {}
}
Well, that’s it.